I am calling this Deb's Smashing Pumpkins Muffins although I used canned pumpkin, so don't freak out on me :) You could bake your own (make sure they are pie pumpkins) saw them in half, scrape, get the stringy things out, save seeds to roast, plant whatever, cook, remove from outer skin....oh what the hey, nope, just use canned pumpkin! Now go preheat your oven to 350 degrees and line your cupcake pans, we're gonna have some fun! (I spray my liners so the muffins do not EVEN have a chance of sticking)!
Do they taste that good? Well I have it on the best of authority that they do! My 20 month old grandson loves them, and unlike Mikey, he doesn't like alot.
 |
| Great plain or... |
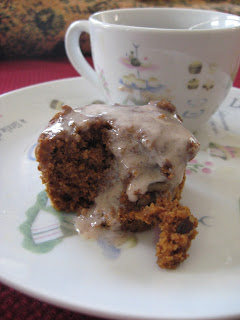
But wait! It gets better! I added a "drizzle" of icing...ok so my drizzle is bigger than some,(you know it's rude that you point that out right? :) but it really is only about 2 teaspoons of icing.
 |
| ...with just a drizzle of icing |
Click above to print recipe and at the bottom of the screen it has print page. :)
Deb's Smashing Pumpkins Muffins
Mix in a large bowl:
1 can of pumpkin
3 T. coconut oil
4 T. natural unsweetened applesauce
1 c. sugar (now u know why uns. applesauce:)
1/3 c. your choice of milk (I use soy)
1 t. vanilla extract
In another bowl:
1 1/4 c. flour (not self rising)
1/2 t. pumpkin pie spice
1 t. cinnamon
1/2 t. baking soda
3/4 t. baking powder ( did u know u can use 2 parts baking soda and 1 part creme of tarter in place of the baking soda if you are out of bk. powder? I tried it, works great!) but still add the other baking soda too)
1/3 c. chopped black walnuts (or your fav. nut)
4 MEDJOOL dates chopped into bits , (yes it needs to be medjool, they totally taste better. You can get them at Sam's or most health food stores.)
& a pinch of salt
The reason I add the nuts and dates in with the flour instead of folding in later is so they are "coated" and don't clump together in the batter.
Mix the 2 bowls of ingredients together. Fill the cupcake liners, I use a large ice cream scoop and it makes it soooo easy to fill the liners without a mess and you get the same size each time. Bake at 350 degrees for 22-25 minutes. (You know you can push a toothpick into the center and if it comes out clean it is done right?)
Do NOT ice until you are ready to eat. Everyone loves these at room temp, but I like them heated in the micro for about 15 secs. as it really brings out the taste of the nuts. Then drizzle on about 2t. of icing. (recipe below)
Icing:
3/4 c. powdered sugar
1 1/2 T. milk (again I use soy made with powder and water)
1/2 t. cinnamon
1/2 t. apple pie spice
1/2 t. vanilla
Mix. That's it! If it is too runny don't add more powered sugar, add dry milk or coffee creamer (hey a flavored one might be good, let me know if you try it please) then you won't have extra sugar! Wanna see what it looks like when you heat it, drizzle on the icing and cut into it? Thought you might!

Who needs Calgon? These can take me away!
Thanks to my friend Cindy for the Girlfriend tea and dessert plate sets she bought for us sisterchicks!
So brew yourself a cup of chamomile tea (it's good for relaxing and hopefully you grew some this summer and have it on hand, we'll discuss how easy that is later!) put it in pretty dishes and put your feet up and really think about all your blessings then thank God for them because that's where they ALL came from!
Stay warm my friends and remember to tell your friends about my new blog.
It says "Easy for you to do" but I simplified it to:
ez4u2do
Big warms hugs, pass them on!